Moxie Teen eye replacement tutorial
Someone asked to see how I switched out Kailey's eyes, so here goes.
What you'll need:
Your doll
Pocket knife
X-acto knife
Tweezers (one or two pair)
Eyes (I used Glib 14mm)
Eye adhesive of some kind
First step: Cutting open your dolly's head.

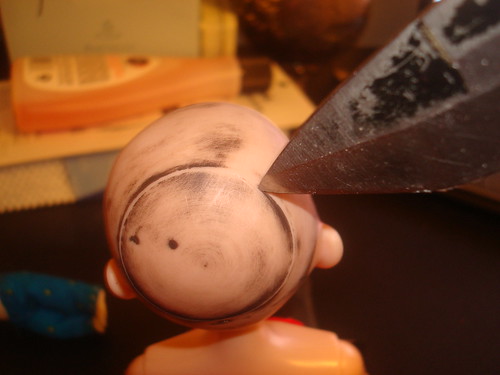
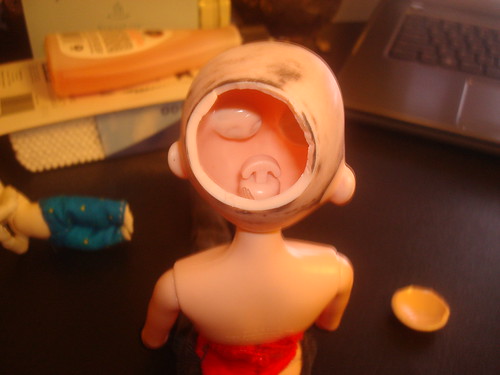
I used a pocket knife, but X-acto knives are more popular from what I've seen. I tried the X-acto knife and it really didn't work well, so I went with a sturdier knife. Right along the seam was a sweet spot that cut like butter when I found it.
Second step: Removing the stock eyes.

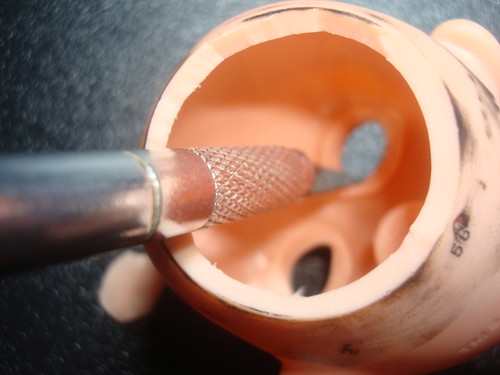
The inside of the head. Those little pockets are what hold her eyes in. Use an X-ato knife and cut them off (sadly not photographed, but there are after pictures)

Something like that. Don't worry about scratching the eyes from behind, and I'll show you why.

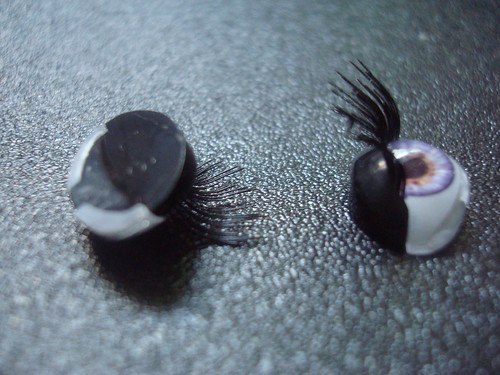
That black thing is a little plastic piece that holds the eyelashes, but it also covers the painted part at the back of the eye. Basically, even if you scratch it, you won't really damage the eye.
From here, it's was a lot of smoothing out the inner socket, checking with the new eye, and then carving out a little more in various places.
Step three: Inserting new eyes

First I actually put the eye adhesive (in this case, poster putty) on the eye very close to the front. (I didn't want to pull her eyes out again to take a picture. I'm lazy )
)

I inserted the eye with a pair of narrow tweezers and positioned it, then holding it by the peg I used a second pair of tweezers to tamp down the putty. I added more putty and used the other end of the tweezers to really get it firmly set in there.

And voila! Kailey now has beautiful, adjustable eyes.
From my experience, I wouldn't go any larger than 14mm for eyes. Those red eyes were her originally intended ones, but at 16mm they wouldn't sit in the socket and there was barely room for the two of them side by side. :/
What you'll need:
Your doll
Pocket knife
X-acto knife
Tweezers (one or two pair)
Eyes (I used Glib 14mm)
Eye adhesive of some kind
First step: Cutting open your dolly's head.

I used a pocket knife, but X-acto knives are more popular from what I've seen. I tried the X-acto knife and it really didn't work well, so I went with a sturdier knife. Right along the seam was a sweet spot that cut like butter when I found it.
Second step: Removing the stock eyes.

The inside of the head. Those little pockets are what hold her eyes in. Use an X-ato knife and cut them off (sadly not photographed, but there are after pictures)

Something like that. Don't worry about scratching the eyes from behind, and I'll show you why.

That black thing is a little plastic piece that holds the eyelashes, but it also covers the painted part at the back of the eye. Basically, even if you scratch it, you won't really damage the eye.
From here, it's was a lot of smoothing out the inner socket, checking with the new eye, and then carving out a little more in various places.
Step three: Inserting new eyes

First I actually put the eye adhesive (in this case, poster putty) on the eye very close to the front. (I didn't want to pull her eyes out again to take a picture. I'm lazy

I inserted the eye with a pair of narrow tweezers and positioned it, then holding it by the peg I used a second pair of tweezers to tamp down the putty. I added more putty and used the other end of the tweezers to really get it firmly set in there.

And voila! Kailey now has beautiful, adjustable eyes.
From my experience, I wouldn't go any larger than 14mm for eyes. Those red eyes were her originally intended ones, but at 16mm they wouldn't sit in the socket and there was barely room for the two of them side by side. :/